spray paint, Tips
10 Tips for Better Spray Painting with Plastidip
10 Tips for Better Spray Painting with Plastidip
Here are a few simple tips to get professional results with plastidip aerosol cans.
1. Instructions
Take the time to read them. They’ll tell you how far to hold the spray can from the object, 12-16″. Shake the can before spraying for 1 minute, if temperature of can is cold, leave can in warm water for 5 minutes before shaking can, this will give you a very smooth finish and you will get more plasti dip out of your can. Warning: not water just boiled or you may have an exploding can of dip all over your room when you go to shake can. For a really good finish apply at least 4 coats of plastidip.
2. Sweep, Don’t Point
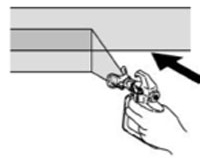
Don’t point the can and press spray nozzle. To get an even coat of plasti dip, sweep the can horizontally past the item as you spray. For example, if you’re moving left to right, you begin spraying to the left of the item, onto the item and then to the right of the item and soon as you pass the edge of the item, release nozzle. when you start your next sweep, to avoid excessive plastidip at the beginning and end of each stroke, always have the aerosol can moving before you press the spay nozzle and continue your stroke after you release the nozzle. To ensure an even amount of paint on the surface, overlap each spray pass by 50 percent. To achieve the proper overlap, aim the spray can so that the tip points at the edge of the previous spray pass.
3. Use a Large Dropcloth
Don’t waste time taping together newspapers that might fall apart as you paint. Instead, use a large plastic or cloth that provides plenty of backdrop for you to move the spray can past the object.
4. Set Up spraying Area
Set up the item you plan to paint on stand, a workbench, or other platform. Don’t set up on the floor. For one thing, you’ll be hunched over. For another, it doesn’t provide easy and consistent access for you to move the spray can past the painted object and you are probably spraying at too steep an angle.
5. Use a Handle
You’ll get far better control and results using a spray can handle than you will holding the can in your bare hand. My preferred handle is the CanGun 1 which we stock at our shop.
6. Rotate Small Objects
Whenever possible, place the object you’re painting on a platform such as a piece of cardboard or a scrap piece of plywood. Then you’ll be able to rotate the object as you paint without touching it. If you have a lot of small parts, it pays to set up the part on a turntable like a Lazy Susan. Spray the object, then rotate the base to spray it from a different angle.
7. Test Spray
Spray onto a piece of wast material, glass, plastic or metal to see the spray pattern that the can produces.on these materials, plastidip is removable. You can adjust your technique and hold the can closer or further from the target, depending on the spray pattern.
8. Experiment With Wet Coating
One technique that can be quite successful is to spray a light coat all over the item you’re painting, and before it has a chance to fully dry, move back and apply more paint so the item is fully wet with paint. when done right it makes a smooth, flawless coating. If you are spraying over a car or applying a stripe with plastidip on good original paint, then apply a very light first coat only. This allows the solvent in plastidip to evaporate very quick and not damage original paint, this first coat when dry also gives a better grip when applying the next heavy coats.
9. Start Smooth, Finish Smooth
A sprayed coating is smooth and reflects light in a way that makes surface flaws obvious. So, before you paint your item, sand it smooth and go over it with primer. That may mean applying several primer coats, with each coat lightly sanded before proceeding.If you are spraying plastidip over a surface with good original paint,then don’t use primer, its not removable. To be able to remove plasti dip easily from non porous surface, apply at least 4 coats.first coat should be very light.
10. Your health & safety
Always wear an appropriate respirator, not a dust mask, a mask with a PP2 Or PP3 rating when spraying any solvent paint. Plasti dip becomes non toxic after the solvent has evaporated. Ensure the work area has appropriate ventilation.

